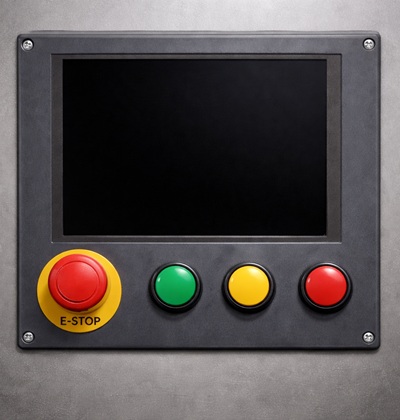
Buttons: Start, Stop and one more
Article#: 00116
Date: 2026-02-17
Author: Radim
In the article When a touch panel isn't enough , I described both the advantages of HMIs (Human-Machine Interfaces) using touch panels and the still very relevant benefits of hardware control elements, including physical pushbuttons.
I also pointed out that the optimal solution is usually not to choose one approach over the other, but to take what is best from both worlds and use a touchscreen together with dedicated physical controls.
Building on that idea, the next logical question is not whether to use a touchscreen or physical controls, but how to combine them in a way that actually improves the operator's work.
As already discussed, for safety-related functions it is mandatory to use physical control elements that are hardwired into the safety logic of the machine.
Functions such as Emergency stop or enabling devices must be independent of the HMI software and operating system in order to guarantee a reliable and immediate reaction.
It also makes a lot of sense to keep Start and Stop functions in physical form.
These functions are used frequently, must always be immediately accessible, and should never depend on the currently displayed visualization screen or an open popup window.
Beyond formal safety requirements, physical controls also increase safety in a broader sense.
For certain functions, they significantly raise the operator's awareness of the action being performed.
Pressing a real button requires a deliberate physical movement and creates a clear moment of decision, which is especially important when executing actions with serious consequences.
And this is exactly where there is room for the third button.
Beyond safety functions and the classic Start and Stop functions, many machines include actions that are not safety-related but are still important enough to deserve a deliberate and conscious confirmation by the operator.
Typical examples include switching the machine between automatic and manual modes, or controlling the machine and its subsystems while in manual or jog mode.
A very effective way to implement this is to clearly separate selection from execution.
The operator first selects a function on the HMI touchscreen panel, which must then be confirmed within a defined time window by pressing a physical button.
In this "select on HMI → execute with physical button" concept, the touchscreen and the hardware control element each play to their respective strengths.
To make this interaction intuitive, the system should clearly emphasize the connection between the selected function on the HMI panel and the physical confirmation button.
An illuminated pushbutton works particularly well in this role.
Using the same highlight color on the screen and on the illuminated button creates a direct visual link between the selected function in the visualization and the pressing of the physical button required from the operator.
By moving the confirmation step from the touchscreen to a physical control, these operator-initiated actions become more deliberate, harder to trigger unintentionally, and clearly reflect the operator’s conscious decision at the machine.
© Radim-Automation, 2020–2026. All rights reserved.
Sharing of this article is permitted with proper attribution (link to the original page).
Related previous articles:
- Redundant PLC – Yes or No?
- How long will a failure keep our production down?
- Resilient machine control design
- When a touch panel isn't enough
- What makes an HMI intuitive?
- HMI - colors in the visualization
- HMI – Don't hide anything
- Choosing an HMI display
- HMI is not a web page
- High Performance HMI
- Dream of a platform-independent PLC program
- PLC network diagram
- It doesn't work without sensors
- Clear signals
- Design considerations for effective HMIS
- Safety relays versus safety PLC
- Knowledge gained from a completed project is priceless
- Machine modularization
- Modular software architecture
- Hardware concept
- A good concept = Complete set of suitable solutions
- Are there also any disadvantages?
- Think critically!
- Design machines with a focus on user's abilities and needs
- Learn from your journey!
- Why do automation projects fail?
- Collect all the requirements and sort them!
- Who will operate?
- Functional and intuitive HMI
- HMI and PLC applications should grow together
- More than just start and stop
- Safety first!
- Do the right things and do them right!
- Define test scenarios and test cases continuously!
- Don't make it worse!
- Industrial evolution - Listen to your customers and follow new trends!
- What does the customer need?
- Don't disappoint your customer!
- Focus on target!
- Don't hide any problem!
- Check the result!
- Keep it simple!
- Success is not a matter of coincidence
- Transparency and reliability
- From an idea to a consistent system
Related next articles:
- Different types of machine stops
- Safety stops must have the highest priority
- Danger! Unexpected machine start
- Buttons reset and start
Comment#: 00001
Date: 2026-02-18
User: Radim
The choice of color for a confirmation / execution button plays an important role in how the operator perceives and uses it.
Yellow fits this function particularly well. It naturally attracts attention and clearly signals that an action is pending and requires awareness. As an illuminated button, it indicates system readiness and guides the operator at the right moment.
In this role, yellow supports the idea of deliberate execution: the operator selects a function on the screen, and the yellow illuminated button clearly communicates when and how to confirm it. The color thus becomes an integral part of an intuitive and safe interaction concept.
Comment#: 00002
Date: 2026-02-19
User: Radim
After publishing the article and my comment about the yellow confirmation button, a former colleague of mine who works in a standardization department pointed out the relevant definitions in the IEC/EN 60204-1 standard related to the use of colors for control elements (thank you, Libor).
According to the standard, a BLUE pushbutton is typically used for reset or acknowledge functions, while WHITE, GREY, or BLACK pushbuttons are considered suitable for general confirmation or execution actions. A YELLOW pushbutton, on the other hand, is intended for control actions associated with situations that require increased attention, such as abnormal operating conditions, interruptions of an automatic cycle, or actions that call for heightened operator awareness. From a strictly normative point of view, and considering the character of my third pushbutton as a confirmation of an action selected in the visualization, a white pushbutton would therefore fit the standard definitions better.
However, my article describes, using examples, the use of a third confirmation / execution pushbutton for actions with potentially serious consequences, where increased operator awareness is desired. In this context, and without contradicting the standard, I still consider a yellow pushbutton to be a reasonable choice. It emphasizes that the action is not a routine confirmation, but a deliberate execution step that requires attention and conscious decision-making. In this sense, the yellow color helps to underline the importance of the confirmation and the possible impact of the action being executed.
Comment#: 00003
Date: 2026-02-22
User: Radim
On many machines, we are used to seeing a blue pushbutton located close to the E-Stop mushroom, typically used to reset the safety circuit.
If the third (yellow) confirmation / execution button, as described in the article “Buttons: Start, Stop and one more”, is introduced for executing functions selected on the HMI, it may seem possible to replace the blue reset button with the yellow one - provided that an HMI panel is present at the same location and the safety reset function can be explicitly selected in the visualization and then confirmed using the yellow button.
However, from a normative point of view, the blue color is clearly associated with reset functions. In addition, the blue reset button is usually hardwired directly into the safety PLC, whereas the yellow confirmation / execution button is typically connected to the standard process controller (the “gray” logic PLC). For frequently used functions such as safety reset, having a dedicated, clearly recognizable physical button remains the recommended solution.
There are also many locations on machines where an E-Stop and a blue reset button are present without any nearby HMI panel. In such cases, a dedicated blue reset button is not only appropriate, but necessary.
Comment#: 00004
Date: 2026-02-23
User: Radim
The exact placement of operating buttons on a machine is not strictly defined by standards. Norms such as IEC/EN 60204-1 focus mainly on safety-related aspects - function, behavior, color, identification, and in some cases reachability - but leave the detailed ergonomic layout to the machine designer.
This places responsibility on the designer to arrange controls in a way that is intuitive and minimizes the risk of confusion or unintended operation. For functions that are used in combination with an HMI, it therefore makes sense to position the related physical buttons in direct proximity to the HMI panel.
Placing the buttons below the display is ergonomically advantageous. The operator’s eyes naturally focus on the screen and are positioned higher, while the arms and hands operate the buttons from a lower position. This vertical separation supports a comfortable posture and a natural workflow.
Another practical advantage is visibility. When the operator’s hand is positioned on a button below the display, it does not obscure any part of the visualization. This applies regardless of whether the left or right hand is used. The operator can continuously monitor the HMI while being ready to actuate the physical control.
Grouping Start, Stop, and the additional confirmation / execution button into a clearly defined control area below the HMI helps build consistency and supports repeatable and intuitive operation.
The Emergency Stop, on the other hand, should remain clearly separated from operational controls to ensure immediate access without the risk of confusion.
Ergonomic layout is not a cosmetic detail - it directly affects usability, reaction time, and overall operational safety.
Comment#: 00005
Date: 2026-02-23
User: Radim
A small design detail that can have a surprisingly big impact on reliability:
Using a hardwired confirmation button connected directly to the PLC is a good and recommended design choice. It reduces dependence on network communication and increases the reliability of command acceptance.
When commands are transmitted from the HMI to the PLC via communication protocols, there is always a possibility that a command may be delayed, lost, or remain pending due to communication issues, temporary network load, or HMI-side problems. A direct wired signal provides a clear, deterministic input that is processed immediately by the PLC logic.
For confirmation and execution functions where a clear and reliable operator action is required, a hardwired pushbutton therefore adds robustness and predictability to the system.
Comment#: 00006
Date: 2026-02-26
User: Radim
"There is one other reason that frequently used buttons be hardwired- over time, the HMI screen may wear out, specifically where the operator has to frequently confirm an action or some other frequently used function."
- Robert Plaschka
- https://www.linkedin.com/feed/update/urn:li:activity:7431724503145119744?commentUrn=urn%3Ali%3Acomment%3A%28activity%3A7431724503145119744%2C7432603062772600832%29&dashCommentUrn=urn%3Ali%3Afsd_comment%3A%287432603062772600832%2Curn%3Ali%3Aactivity%3A7431724503145119744%29
Comment#: 00007
Date: 2026-02-26
User: Radim
Response to a previous comment by Robert Plaschka:
Thanks for the addition, that’s a very valid point. HMI wear over time (particularly on frequently used on-screen buttons) is often overlooked, and it’s another good reason to keep hardware pushbuttons as part of the interface.
Do you find it possible to push back against the widespread move to touch-only panels and still keep hardware pushbuttons for some frequently used functions?
- https://www.linkedin.com/feed/update/urn:li:activity:7431724503145119744?commentUrn=urn%3Ali%3Acomment%3A%28activity%3A7431724503145119744%2C7432603062772600832%29&replyUrn=urn%3Ali%3Acomment%3A%28activity%3A7431724503145119744%2C7432670690341789696%29&dashCommentUrn=urn%3Ali%3Afsd_comment%3A%287432603062772600832%2Curn%3Ali%3Aactivity%3A7431724503145119744%29&dashReplyUrn=urn%3Ali%3Afsd_comment%3A%287432670690341789696%2Curn%3Ali%3Aactivity%3A7431724503145119744%29
Comment#: 00008
Date: 2026-02-26
User: Radim
I believe there are two main reasons why hardware buttons are nowadays replaced entirely by on-screen buttons in the visualization.
The first reason is aesthetics: the panel looks sleek and clean, and hardware buttons can disrupt that smooth design.
The second reason is cost: adding a hardware button, along with its mounting and wiring on the machine, is more expensive than implementing the function in the visualization.
However, after months of operation, the touchscreen tends to wear out in areas where frequently used functions are located. The sleek, smooth design is no longer maintained, and the cost of replacing a worn-out touchscreen can be substantial.
I understand the importance of keeping project costs under control and choosing a cheaper solution when it is sufficient. Yet in this case, there is a hidden paradox: opting for a cheaper solution upfront - relying solely on touchscreens - can result in significantly higher costs later.
For these reasons, keeping hardware pushbuttons for certain frequently used or critical functions can improve reliability, usability, and even long-term cost-effectiveness.